My Latest Make: DIY Wrap Top
The Pattern
I have broken down the step of creating the pattern below:Step 1: Basic Pattern

- To start of making the wrap top pattern, trace around an existing t-shirt. This top should be made out of a non-stretch fabric. It doesn't need to be anything fancy, just a simple t-shirt. I've used this method on every pattern I've made, just tracing around existing pieces of clothing I have. This is similar to making a basic bodice block that most sewers make.
- Locate the waistline on your top pattern (marked with the red line) and mark this on your pattern. Extend the waistline 4 inches from the center front. Connect a line from the neck shoulder seam down to this point. I also curved the bottom of the pattern up towards this point as well. It should look similar to the image
- You should end up with something that looks like image 1c)
- For the back pattern trace around basic top again.
- This back piece will be cut on fold as shown in the image.
- For the sleeves, my basic top had short sleeves, but for my wrap top, I wanted longer sleeves, so I just extended my pattern again.
- You will need to cut two of the sleeve pattern pieces. You can choose whatever length you want, these were just my preference.
Step 2: Bodice front

- Similar to the back bodice, use the same measurement of 6 inches to measure up the side hem. Draw a horizontal line across your top
- You will again end up with two pieces, where the top piece remains unchanged, and the bottom piece we will be altering. As shown in the drawing, draw a vertical line down that piece (the dashed line), splitting it into two
- Cut the piece along the dashed line and spread apart. I spread it apart by 8 inches again. Connect the pieces together, smoothing out the curve
- You should end up with these two pieces, again the top piece unchanged.
Step 3: Sleeves

- I wanted to add some gathers at the bottom of the sleeve near the cuff. So start of tracing the sleeve and extended down to the length of your arm
- Instead of the sleeve tapering down to your wrist, I just drew a vertical line straight down the side seams (dashed line)
- You should end up with this shaped sleeve
Step 4: Back Pattern Pieces

- About 6 inches above the bottom hem, mark a horizontal line across the bodice back. This is where we are going to separate the pattern to make the ruffle
- You should end up with something like this. The top part of the bodice remains unchanged, while the bottom half we will be altering
- Depending on how much ruffle you want, extend your pattern from the fold line. For reference I extended my piece about 8 inches
- You should now end up with two pieces as shown, remembering that the top half of the back bodice remains unchanged
Step 5: Final Pattern Pieces

Once you've done the alterations, you are finished. The drawing shows how many pieces to cut of each pattern. I've added two additional pieces; a cuff piece which you cut 2 off, measuring 2 inches wide and length is your wrist measurement. and the belts which you also cut two off and measure 4 inches wide and you can make these as long as you want.
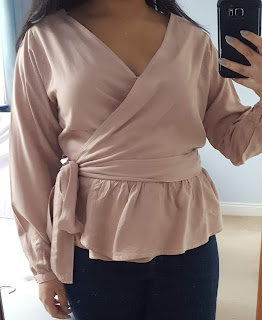
The Final Top
I really really like this top. I absolutely love it! Haha! I love the thickness of the ties as I feel it makes the top look more high-end. I like the length of the sleeves as well. I do wish I made the sleeves slighter more wider at the wrists, to add more gathers/ did more rows of gathering because I think the gathers could've been neater. For this version, I think the fabric is either a heavy viscose or cotton. It was so easy to sew up and I think I'll probably make another long sleeve version as well. I've already cut out a black version which doesn't have the extra ruffles at the bottom, but I've added some design variations to it.


Comments
Post a Comment