DIY Wrap Skirt Pattern
Hi guys,
So in my last post (my Autumn sewing plans) I had mentioned that I am obsessed with wrap skirts. They suit my body shape and comfortable to wear. The pattern and sewing construction is really easy!
My measurements: 40"/2= 20"
Add seam allowance= 22"
Pattern Piece B:
Pattern piece B is the center back piece and does not require a large seam allowance. It is simply calculated by dividing your fullest hip/butt measurement by 2.
My measurements: 40"/2= 20" (inclusive of seam allowance)
So far this is what you should have:
The thickness of the waistband is up to you. For a guide I wanted mine to measure 1" once sewn together. To make the pattern do 1" x 2= 2" plus 1" seam allowance= 3".
The length of the waistband doesn't need to be as big as the total width of the skirt (64") since we have added darts and seam allowance. Since there are 4 darts which each have 2" thickness, minus 8 " from your total width of skirt:
Waist tie:
To make your life really easy you can use the exact same pattern piece as the waistband. If you want your tie to be longer so that you can do a bow, then add a couple more inches to the length:
And that is it! It isn't as hard as it looks! Honest! To help you guys out I've made a table for you to fill out:
A quick side note; if you want the skirt to wrap over more; make either piece A or C slightly wider, by adding on a couple of inches i.e. for my pattern piece A the width is 22", so I can add about 5" extra for more overlap, resulting in a width of 27". Piece B and C remains the same i.e. 20" and 22" respectively.
Hopefully that is easy to follow! When I make another wrap skirt, I will show you guys a sewing tutorial.
Bye!
So in my last post (my Autumn sewing plans) I had mentioned that I am obsessed with wrap skirts. They suit my body shape and comfortable to wear. The pattern and sewing construction is really easy!
There are only a total of 5 pattern pieces needed!
Before we start making the pattern, there are two measurements needed; Full hip/ butt measurement* and desired length of wrap skirt measurement.
* measure around the fullest part of your hip i.e. around your butt! The reason for this is so that once darts are added to the top of the skirt, the skirt will nicely contour around your hips and will be a fitted skirt.
Below are my measurements, which I will use to show how to calculate the lengths and widths of the pattern pieces.
Fullest hip/ butt measurement: 40"
Length of wrap skirt: 32"
Pattern Piece A and C:
To simplify pattern piece A and C have the same measurements. To calculate the width of piece A and C, divide your fullest hip/butt measurement by 2.My measurements: 40"/2= 20"
Add seam allowance= 22"
Pattern Piece B:
Pattern piece B is the center back piece and does not require a large seam allowance. It is simply calculated by dividing your fullest hip/butt measurement by 2.
My measurements: 40"/2= 20" (inclusive of seam allowance)
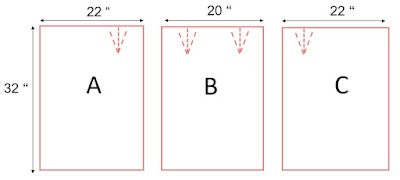
So far this is what you should have:
You might notice that the total width of the skirt (22+20+22=64") is larger than your full hip/butt measurement. This is because the skirt wraps over at the front so you need extra material.
I've also drawn in some darts on the pattern pieces. Each dart length is 3" and lies 4" from the side seam. The dart will be 1" thick:
Waistband:
The length of the waistband doesn't need to be as big as the total width of the skirt (64") since we have added darts and seam allowance. Since there are 4 darts which each have 2" thickness, minus 8 " from your total width of skirt:
Waist tie:
To make your life really easy you can use the exact same pattern piece as the waistband. If you want your tie to be longer so that you can do a bow, then add a couple more inches to the length:
And that is it! It isn't as hard as it looks! Honest! To help you guys out I've made a table for you to fill out:
A quick side note; if you want the skirt to wrap over more; make either piece A or C slightly wider, by adding on a couple of inches i.e. for my pattern piece A the width is 22", so I can add about 5" extra for more overlap, resulting in a width of 27". Piece B and C remains the same i.e. 20" and 22" respectively.
Hopefully that is easy to follow! When I make another wrap skirt, I will show you guys a sewing tutorial.
Bye!


Comments
Post a Comment